
It’s hard to learn how to install Jupyter Notebook unless you read this thorough instruction. You’re at the right place if you’re a novice and want to know the best way to install Jupyter Notebook. The Jupyter Notebook has become quite popular among data scientists and researchers due to its adaptability, ease of use, and ability to combine documentation, data, and code into a single document. Moreover, everything you need to know to get started with the Jupyter Notebook download, from installation to progressive features, will be covered in this comprehensive tutorial.
Additionally, a very effective tool for creating and presenting data science projects interactively is Jupyter Notebook. Similarly, it creates a unified and expressive workflow by integrating code, narrative prose, graphics, and other rich media into a single document.
Keep reading and exploring to learn how to download Jupyter Notebook on Mac, Windows, and Linux operating systems in 2025.
What is Jupyter Notebook?
Jupyter Notebook is a useful tool for combining code with Markdown. Moreover, it provides fast response on running code snippets, making it perfect for data analysis and experimentation. However, it is the preferred development environment for a large number of data scientists, machine learning practitioners, and software developers.
Jupyter Notebook supports code and text cells in addition to providing an interactive programming environment. Similarly, in the text fields, Markdown syntax is acceptable. As a result, you may use simple text, LaTeX mathematical calculations, and more to explain your project’s progress. Similarly, these processes include data transformation, data cleansing, statistical modeling, data visualization, mathematical computations, machine learning (ML), and deep learning concepts. However, that is why learning how to install Jupyter Notebook is necessary in 2025.
Additionally, a Jupyter notebook is an editable file saved in the ipynb format. The notebook interface of Jupyter Notebook allows users to manage multiple notebooks. Kernels are also seen in Jupyter notebooks. Moreover, Kernels give the user results by running interactive programs written in a particular programming language. Additionally, Kernels likewise handle introspection and tab completion requests.
The online interface’s “Download As” option allows Jupyter Notebooks to be converted into an open standard format, such as HTML, LaTeX, PDF, Markdown, or Python frameworks. The conversion procedure may also be automated with tools like nbconvert. Now, we will discuss how to install Jupyter Notebook on Linux, Mac and Windows.
What is Anaconda, Conda, and Miniconda?
The Anaconda is a Python and R distribution that includes development environments, packages, and other resources to get you started working with data. Nevertheless, it needs a lot of RAM (3 GB). Miniconda is a lean version of Anaconda that doesn’t have any pre-installed packages or environments but uses less RAM (about 50 MB).
Conda is included with both Anaconda and Miniconda. Moreover, Conda manages packages. Installing, updating, and uninstalling packages is made easier by package managers. We’ll utilize both pip and another well-known package management system. Conda and pip are different in that pip exclusively handles Python packages, whereas Conda manages environments and packages in any programming language, including Python.
Since pip is the approach that the Python Packaging Authority recommends for managing Python packages, we shall utilize it. Additionally, Conda oversees the Jupyter Notebook as part of our process.
How To Install Jupyter Notebook on Windows?
When installing Jupyter Notebook, Windows users have several options:
- Using the PIP package manager (recommended).
- Via Miniconda.
- Using Anaconda.
The procedures for using Anaconda to run Jupyter are the same as those for Linux (discussed in the preceding section). The parts that follow provide descriptions of the other two approaches.
Installing Jupyter Notebook Using pip on Windows
To use pip to know how to install Jupyter Notebook on Windows, follow these steps:
- Create a virtual environment by opening the command prompt:
Python -m venv [venv-name]
Then, replace [venv-name] in the command with the name of your virtual environment.
- Then, execute the script for activation:
scripts\activate [venv-name]

The command activates the virtual environment.
- After that, set up Jupyter using:
pip install jupyterlab
The virtual environment is where the software is installed.
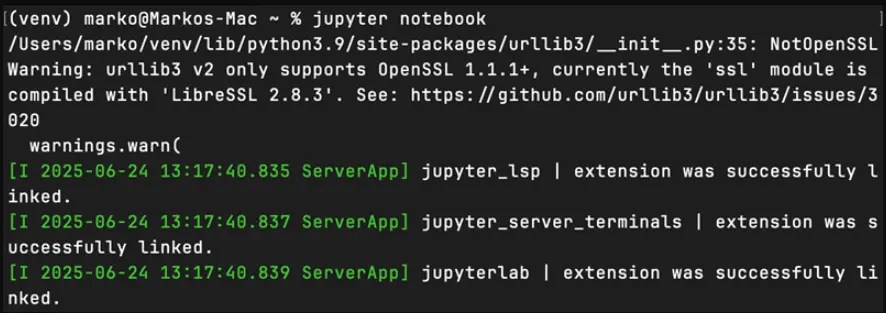
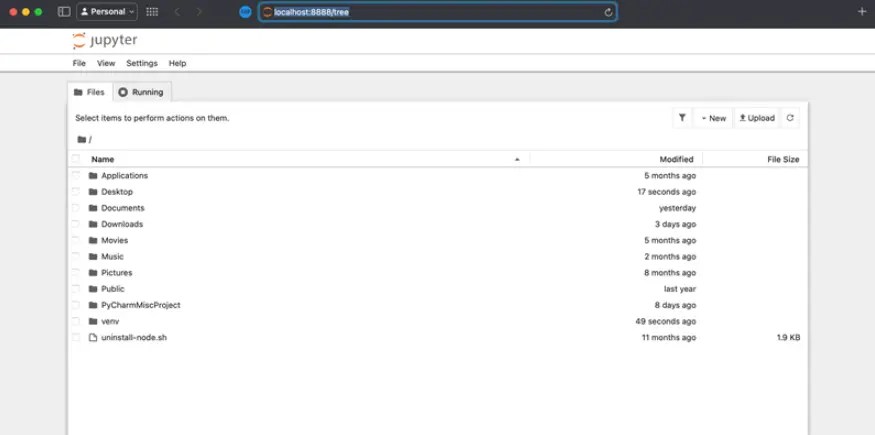
- Use the following to launch a Jupyter Notebook server locally:
Jupyter Notebook

Only within the virtual environment does the command function. It launches as an app within the browser. If not, open a web browser and copy and paste one of the output’s URLs.
- Press CTRL + C twice to end the Jupyter Server session.
Also Read: How To Install pip3: Step-by-Step Guide For Mac, Windows, and Linux
Installing Jupyter Notebook Using Miniconda on Windows
Miniconda is a compact version of Anaconda. To install Jupyter with this method:
- Launch the prompt for Anaconda.
- Construct a conda environment, which is comparable to a virtual one:
Conda create -n [environment-name] python=[version]
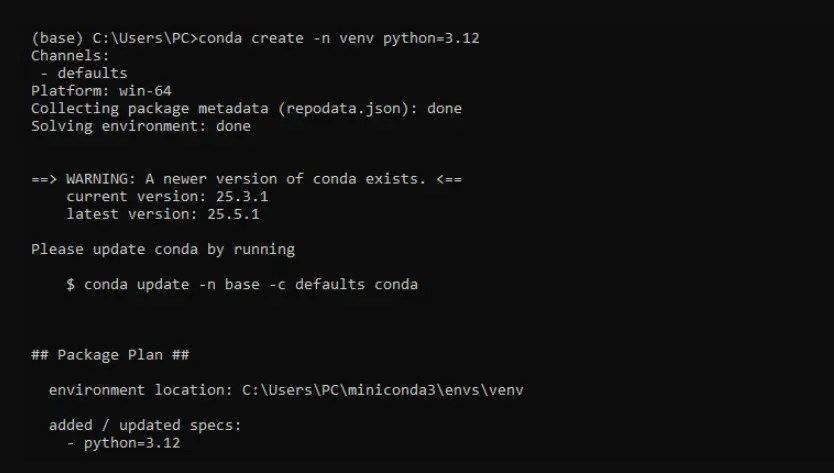
Change the command’s [environment-name] and Python version. To verify the installation, press Y.
- Turn on the surroundings with:
Conda activate [environment-name]

The environment is switched to, and the command is activated.
- Set up Jupyter:
Conda install jupyter
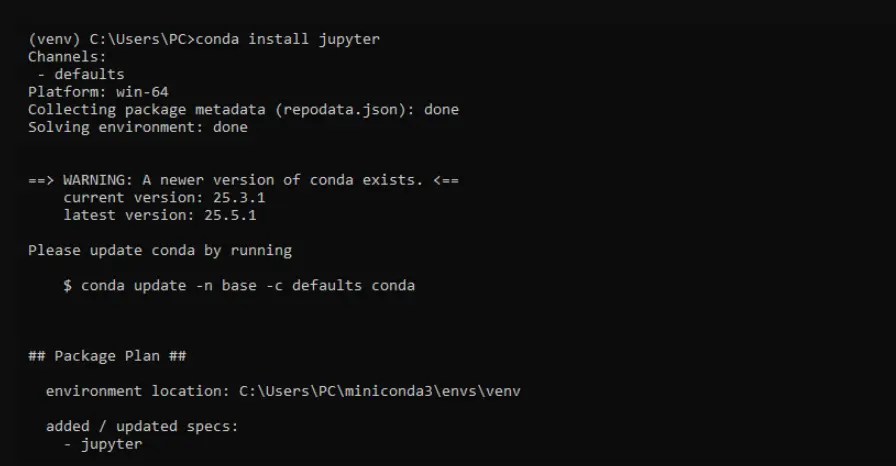
The conda package manager immediately installs all essential dependencies. Press y and Enter to verify the installation when asked.
- Use these to launch the Jupyter server:
Jupyter notebook
The program launches a browser window with the notebook environment.
Also Read: Python Microservices: A Beginner’s Guide To Scalable Systems
How to Install Jupyter Notebook on MacBook?
There is also a Jupyter Notebook for macOS. Here is how to install Jupyter Notebook in two ways:
- Using PIP and a virtual environment.
- Using Homebrew (Mac users must install Homebrew first).
Choose a technique that works best for your setting, then adhere to the instructions below.
Installing Jupyter Notebook on Mac Using pip
Do the following in the terminal to install using pip:
- Establish a virtual world with:
Python 3 -m venv [venv-name]
There is no output from the command. It generates a directory named [venv-name] and adds virtual environment information to it.
- Change to the setting with:
Venv-name source [bin/activate]

The command modifies the virtual environment and executes the activation script.
- The PIP package manager, which may install Jupyter, is present in the virtual environment:
pip install jupyter

The package manager also installs all necessary dependencies.
- Use the following to launch the Jupyter Notebook server:
Jupyter notebook
The notebook environment is available for use and operates within the browser.
Installing Jupyter Notebook on Mac Using Homebrew
A convenient and speedy method for installing Jupyter Notebook on macOS is to use Homebrew. Take the following action:
- The relevant package is available in the Homebrew repository:
brew install jupyterlab

Hold off until the installation is finished.
- When the atmosphere is prepared, begin with:
Jupyter notebook
The command launches the notebook environment in the browser and launches the server.
How To Install Jupyter Notebook on Linux OS?
To install Jupyter Notebook on Linux OS, follow these three steps:
- Use the PIP package manager in a virtual setting (recommended).
- Via Anaconda.
- Using the package manager for APT (not advised)
Installing Jupyter Notebook on Linux Using pip
To know how to install Jupyter Notebook on Linux using pip:
- Launch the terminal and establish a virtual world:
Python 3 -m venv [venv-name]

Enter the environment name or path in lieu of [venv-name]. The command creates the isolated Python environment and a directory with that name.
- The virtual environment activation script is located in the directory. Turn on the surroundings with:
Venv-name source [bin/activate]

The virtual environment is shown on the terminal.
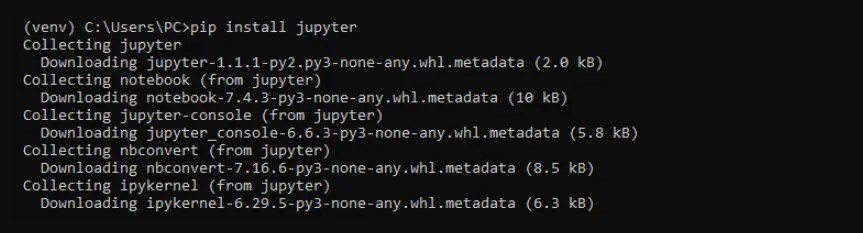
- Install Jupyter and its components using pip:
pip install jupyter

Hold off until the installation is finished.
- Use these to launch Jupyter Notebook:
Jupyter notebook
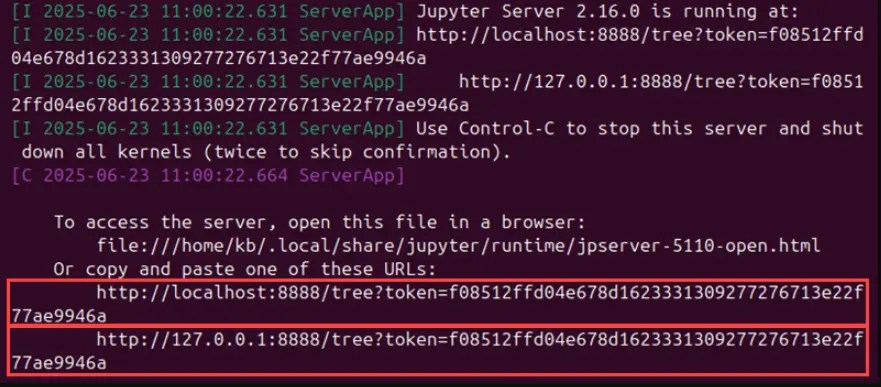
The server is launched as a web browser application with the command. Copy and paste one of the recommended URLs from the output by hand if the program does not open.
- Go back to the terminal and hit CTRL + C to exit.

To exit the Jupyter Notebook and verify that the server has shut down, press Y.
Installing Jupyter Notebook on Linux Using Anaconda
The installation of Anaconda comes with an automated installation of Jupyter Notebook.
- Note: Jupyter Notebook is not automatically included when using Miniconda. It requires manual installation using conda. The Windows section contains the instructions for this strategy.
- Use the terminal to launch the laptop environment after installation:
Jupyter notebook
- Using the default browser, the command launches the notebook server.
- As an alternative, use the Anaconda GUI to learn how to install Jupyter Notebook:
- Launch the software Anaconda Navigator:
Anaconda-navigator

The activated (base) environment is where the command operates.
- Go to the page for Environments.

- By default, the base (root) environment is listed among the environments. Choose Open with Jupyter Notebook after clicking the Run button.
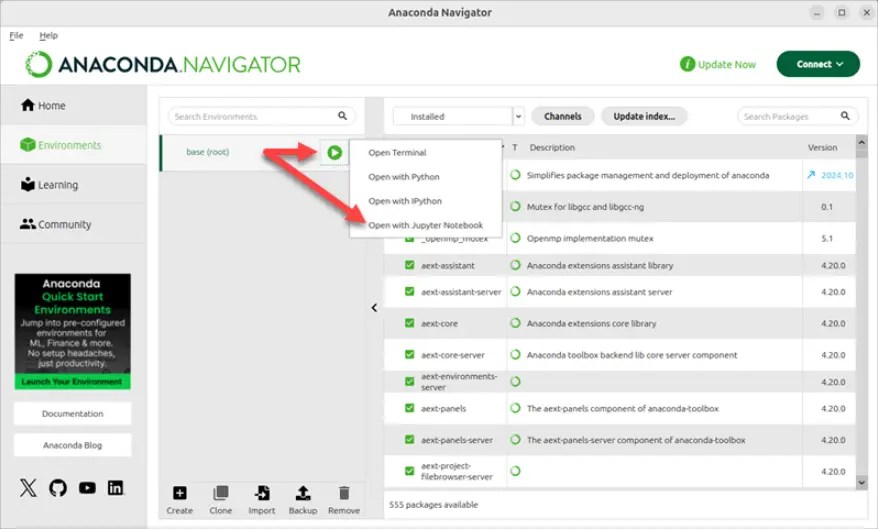
Import an existing environment or set up a fresh one using one of the buttons at the foot of the environments list.
Conclusion
Well done! The Jupyter Notebook has been successfully installed on your PC. However, utilize its interactive and collaborative environment to carry out coding, data analysis, and other activities. Learn all Jupyter has to offer to increase productivity and streamline your computing tasks.
You should have a thorough understanding of how to install Jupyter Notebook after following our instructions. As a data scientist, having Jupyter installed on your PC might be helpful. If you have an interest, you may also check out Project Jupyter’s other offerings. JupyterLab adds further functionality to the original Jupyter Notebook. However, comment below if you are still struggling to find how to download Jupyter Notebook in 2025.
FAQs (Frequently Asked Questions)
How To Install Jupyter Notebook In Python?
- Get Anaconda. We advise obtaining the most recent version of Python 3 (currently Python 3.9) from Anaconda.
- Follow the directions on the download page to install the Anaconda version you downloaded.
- Congratulations! You’ve successfully installed Jupyter Notebook.
How Do I Install Jupyter Notebook In CMD?
- Press the Windows icon key + R to launch the command prompt after installing Python, then type cmd in the Run dialog box.
- To install the Jupyter Notebook, execute pip install jupyter in the command window.
How To Run Jupyter From Pip?
You may use this command in your terminal or command prompt to start Jupyter Notebook after the JupyterLab installation: Jupyter notebook.
How To Install Jupyter Notebook For Mac?
To install Jupyter Notebook on a Mac, either use the command-line pip install jupyter after installing Python yourself, or download and install the Anaconda installation from www.anaconda.com, which bundles Python and Jupyter with several other scientific tools. Moreover, after installation, run the Jupyter Notebook dashboard in your web browser by typing Jupyter Notebook into the Terminal program.